
🧢 Holy Stitch! 👖
A deep dive into how clothing gets made!

⚙️ Mechanical Engineering Resources:
We have put a dozen guides for mechanical engineering students and early professionals on our website
50 Hardware Startups who have raised less than $50 million (perfect internship targets)
How to handle The Behavioral Interview
What it takes to be The 10X Intern

Meet our sponsor, Jiga! They connect you directly with manufacturers. Real quotes, from real humans, for real hardware, fast.
🦸 Guest Writer: Madhav!
This week’s newsletter is a special edition written by Madhav Bhat on softgoods manufacturing! Madhav graduated from the University of Michigan with a BSE and MSE May of 2024. Throughout his recruiting journey he interviewed for mechanical engineering internships and full-time positions with companies from large Fortune 500 corporations (think Ford, Michelin, Apple) to growth-stage companies (think Tesla, SpaceX, Anduril) to startups ranging from 3-1000 people in size working on all sorts of projects.
Introduction
When I used to work in automotive manufacturing, things like tolerance stack-up analyses and GD&T were pretty fleshed out for the rigid bodies involved. Material properties were known and you could get a pretty good idea for the process windows needed for the parts you were working with. Recently, I got some clothes I ordered that were different from the online size chart and it made me think, what does process control and tolerancing look like for softgoods? Like clothing? Not only from a manufacturing standpoint but down to design - is there CAD software for apparel? Actually, forget that. End-to-end how is clothing made, especially at the scale we’re at today? This made me dive into a rabbit hole to answer “how does mechanical engineering work for apparel and other softgoods?”.
Design and the “tech pack”
Let’s start with design. The universal term for a design summary for softgoods/apparel is a “technical design pack” or “tech pack” for short. The tech pack consists of:
Technical Drawings & Callouts
Precise line drawings with notes on construction details, stitching, seams, hardware, and placement.
Bill of Materials (BOM)
A complete breakdown of all materials and components. It includes fabrics, foams, fasteners, and sensors required to build the product.
Measurements & Grading
Dimensions, tolerances, and size variations to ensure consistent fit across different body types or product sizes.
Assembly Instructions
Step-by-step construction methods that guide how pieces come together, whether sewn, bonded, or mechanically fastened.
Testing & Performance Standards
Requirements for durability, washability, strength, or medical-grade compliance, depending on the product category.
Labeling & Branding
Placement of logos, care instructions, or certifications that connect the product to its brand identity and compliance needs.
Honestly this seems pretty similar to traditional product development however let’s dive deeper into parts 1 and 3, the technical drawings and measurements.
Technical Drawings & Measurements
In traditional mechanical design, this is pretty easy to visualize. You can use any CAD tool to create engineering drawings of the part/assembly you want to create with the appropriate tolerances and measurements listed. Simple GD&T.
It’s even simpler in apparel design and it looks very similar to a sizing chart you’d see online. The common tool for creating these drawings is Adobe Illustrator.
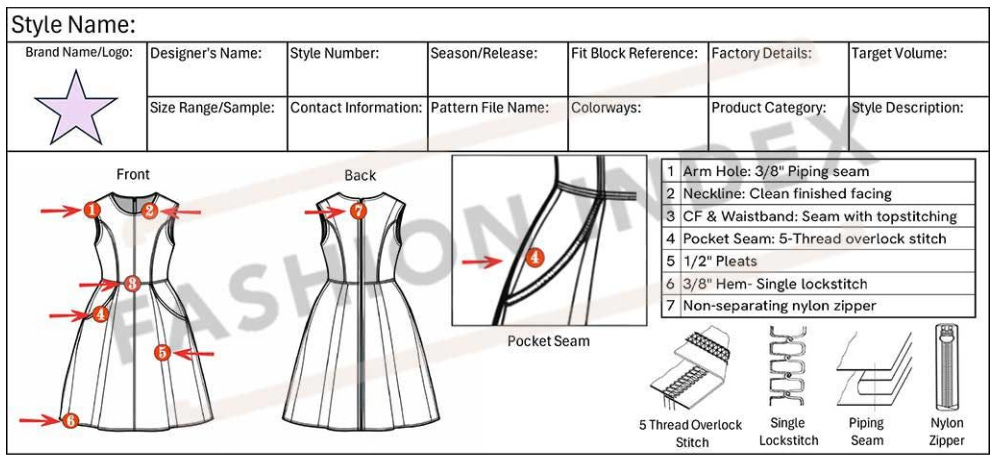
Looking at this, my immediate reaction was “no wonder there’s so much variance this seems so vague”. Also where are the measurements?” After some more digging, there’s actually 3 documents that come together to paint the picture of how apparel should be designed. There’s the flat which is what is pictured above, there is the POM diagram which contains the measurement locations (what is actually being measured - pictured below), and there’s a spec sheet table which contains the actual numbers (also pictured below).

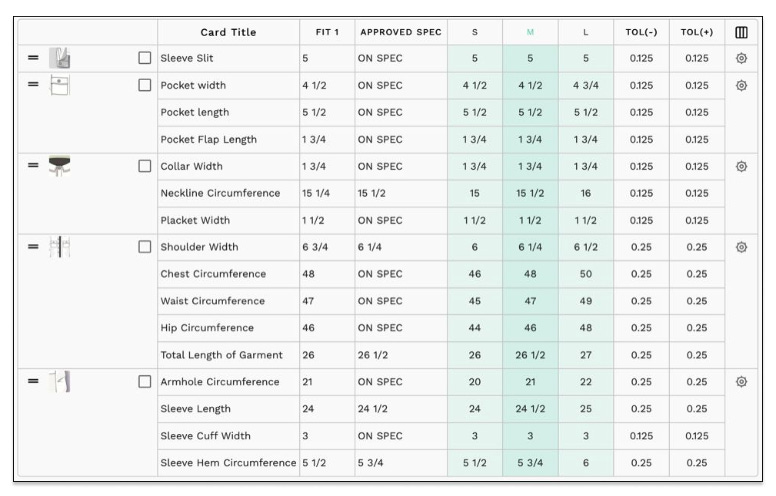
Ok so this makes sense, but where are these tolerances coming from? The primary driving factor is something called “the grade rule” which is pretty simple: the difference in each dimension between each size divided by 2 is generally what you should set your tolerance to. Example:
You have a t-shirt in size M with a chest measurement of 20”. Size L is 21”, and size XL is 22”. That 1” jump between each size is the grade rule for chest width.
Now, what tolerance do you set on the chest measurement? You can’t allow more than ±½” — because if you did, a sloppy M could measure 20.6” and a sloppy L could measure 20.4”, and suddenly your M is bigger than your L. The sizes have crossed over and your sizing system has collapsed.
So the tolerance is constrained by the grade rule. If sizes jump by 1”, your tolerance ceiling is ±½” (half the grade). If sizes jump by 2”, you could allow up to ±1”. Makes sense. There are also of course other factors that contribute like the process capability of the factory (similar to traditional mfg.), size of the details (ex. width of a skirt vs. side pocket of it), material properties, and brand standards. But the grade rule is the general loose rule.
The final product here is a design for a garment that can be tested to make sure it can be productionized.
Simulation and Testing
I was surprised to learn that there were simulation tools built around the garment industry and they actually measure similar metrics to what tools like FEA do. One specific example I’ll focus on is CLO 3D. The simulation software requires a lot of input on the material properties of each of the elements. Once you plug in the material properties, there’s an interesting way to do the validation and make sure it’s correct:
CLO validates its digital fabric twins using a drape test: physical and digital fabric are cut to the same 50×50cm sample and draped over an identical cylinder. The digital twin is considered accurate if the height of each drape corner matches the physical sample within 1cm, and the number of drape flares matches within one.
Once calibrated, the designer imports 2D pattern pieces, virtually sews them together, and drapes the resulting garment on a parametric avatar. The software then runs a physics simulation and outputs several analysis modes:
Stress map — shows force per unit area along the fabric grain, displayed as a color gradient from blue (no stress) to red (high stress). Tight areas around armholes, crotch, or bust show up immediately.
Strain map — shows how much the fabric is stretching relative to its natural state, which tells you whether a stretch fabric is being deformed beyond its design range
Pressure map — shows external pressure the garment is exerting on the avatar body, critical for compression garments and sportswear
Fit map — a simplified pass/fail overlay showing where the garment has sufficient ease, is too tight, or is too loose
Once simulation is done, we can move on to physical testing, a lot of which needs to be in accordance with regulations set by governing bodies like ASTM International, ISO, and AATCC (American Association of Textile Chemists and Colorists). There are some pretty interesting tests here including:
Seam strength is evaluated by sewing a seam in the fabric, clamping it at one end, and pulling with weights at the other until the seam separates a specified distance. Similar to a standard tensile test using an Instron.
Dimensional stability tests use ISO 5077 and ASTM D4970 to assess shrinkage or elongation after laundering. Acceptable shrinkage rates generally range from 3–5% for most adult apparel and as low as 1–2% for fitted items.
Colorfastness to washing (AATCC Test Method 61) simulates multiple home launderings to assess color change and staining. Colorfastness to light (AATCC Test Method 16) evaluates resistance to fading from light exposure. Colorfastness to rubbing (ISO 105-X12) tests whether color transfers to other surfaces under friction.
Chemical / Safety Tests
Formaldehyde content — residual from wrinkle-resistant finishes, regulated in children’s wear
pH testing — ensures fabric won’t irritate skin
Heavy metals — particularly lead in dyes and prints
Restricted substances — phthalates, azo dyes, flame retardants, etc.
Flammability — mandatory for children’s sleepwear and certain workwear
Much more test based on the type of apparel being made (waterproofing, moisture wicking, thermal resistance, etc.)
Overall the guiding principles around testing and simulation are pretty analogous to what we learn in class for testing in mechanical engineering. Now that we’ve tested and meet all the regulations to bring these clothes to the market, it’s time to make them!

Subscribe to Pipeline Media Lab and get the free PDF: 5 Engineering Decisions that Built Careers. Hamilton. Moore. Grove. Real decisions, real stakes, frameworks you can use this week. Scan the QR code or subscribe here.
Manufacturing
So now that we have a design spec for a piece of clothing, what happens next? Assuming it’s going to be manufactured at scale, it’s going to go through a couple steps for industrial garment production.
The general flow is: design → fabric sourcing → pattern making → grading → marker making → fabric spreading → cutting → bundling → sewing → in-line inspection → ironing and finishing → tagging → final inspection → packing → dispatch. Almost all of this is manual.
To be honest, the majority of clothing factories have zero automation. The biggest automation here is the fact that they’re not hand sewing or cutting with scissors. Even a company like Shein that is producing clothing at en masse (1.2 million items of clothing per day) is not really using any manufacturing automation, just a bunch of small factories (and some complicated software).
For the minority of apparel brands that are investing in manufacturing automation, some of the key areas are automatic cutting machines, and minor automations in pressing, tagging, folding and cutting. There are also machines that do automatic sewing, but not all sewing. The big problem is general-purpose automated sewing of limp fabric. Every automated sewing machine on the market today either requires the fabric to be clamped into a rigid fixture, or requires a human hand to pick up each panel, align the edges, and feed the material through at the correct tension.
The gap between current machines and the ideal comes down to three things humans do by feel that robots can’t yet do reliably at production speed: picking a single fabric ply off a stack without distorting it (the material has no rigid reference geometry), tracking a seam edge under tension as the fabric stretches and drifts (requiring constant micro-corrections a skilled sewer makes unconsciously), and navigating 3D curved seams like setting a sleeve into an armhole, which requires easing two deformable surfaces into alignment simultaneously.
Until those three problems are solved cheaply enough to beat a $1,200/month sewer in Guangzhou, the sewing floor will look essentially the same as it did in 1965 (but with some of the machines I mentioned above). Maybe humanoids are the answer here (but even they are not dextrous enough yet it seems like to take the job of a skilled sewer), but if you’re looking to be a founder, this is a pretty interesting problem with a large TAM!
One thing to emphasize here is that a lot of apparel companies don’t own this manufacturing workflow end-to-end. They’ll primarily be responsible for just the design and will outsource the manufacturing to some contract manufacturer. This is pretty different from what we see in traditional mechanical engineering.
However, the ones that are vertically integrated and do it well can reap some big benefits. A big case-study is Zara that owns their factory and can produce garments in response to sales data and market trends pretty easily. They also apparently use a technique called “modular manufacturing” where garments are broken down into components that can be assembled later (so likely fewer total steps needed to assemble a completed garment).
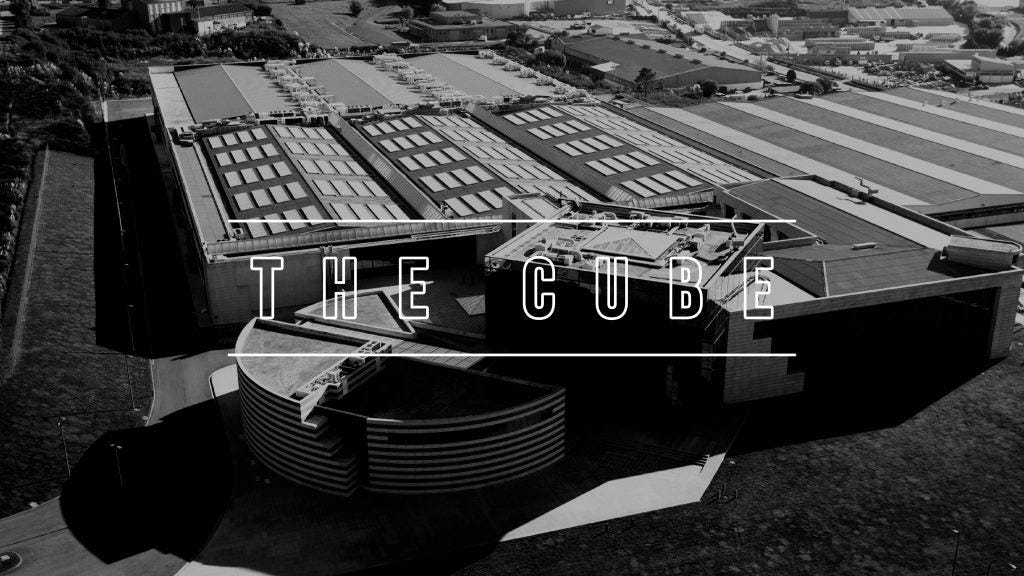
Also wow, the infrastructure they’ve built around this is insane. Zara has a 5 million sq. foot distribution center in Spain called “the Cube” that is directly connected to 11 Zara-owned factories via 200 km of underground tunnels. With monorail. Like what. Maybe we should do an entire article on just Zara.
Anyways, that’s a high-level overview of how apparel is made! To be honest this is pretty dated and focuses a lot on how apparel has been made in the past. It also probably heavily depends from company-to-company, and I’m sure giants like Nike and Adidas have much more processes and advanced technology here that I didn’t capture in the article. There are also some startups that are really revolutionizing how clothing is made (the main one I’m tracking right now is Unspun) and I want to capture how they’re changing the processes described above. Maybe for a future blog!
My desired goal state for apparel manufacturing is the following:
